


In a future where Earth no longer belongs to humans, but is controlled by an artificially controlled machine power, a small remnant of survivors struggle to have any prospects at all. The surface has become a hostile territory, no longer a place of civilization, but a hunting ground for the ARC units, a technologically superior, relentlessly patrolling robot army. Humanity’s last refuge is deep underground: Speranza, a place that is at once a shelter, a black market, an emergency camp, a workshop and a desperate spark of hope.

From here, only the bravest or those with no alternative venture to the surface: raiders, they don’t climb to the top to achieve fame, but to ensure the survival of the community. Each trip to the surface, in the game Topside, is a single attempt to recover resources, technical remains, weapons, blueprints or materials. If you don’t return, you’ve lost. It’s not what you find that counts, but whether you return alive. This is exactly what gives ARC Raiders its unique feel: it’s not a shooter where the strongest wins, but a mental test where the smartest survives.
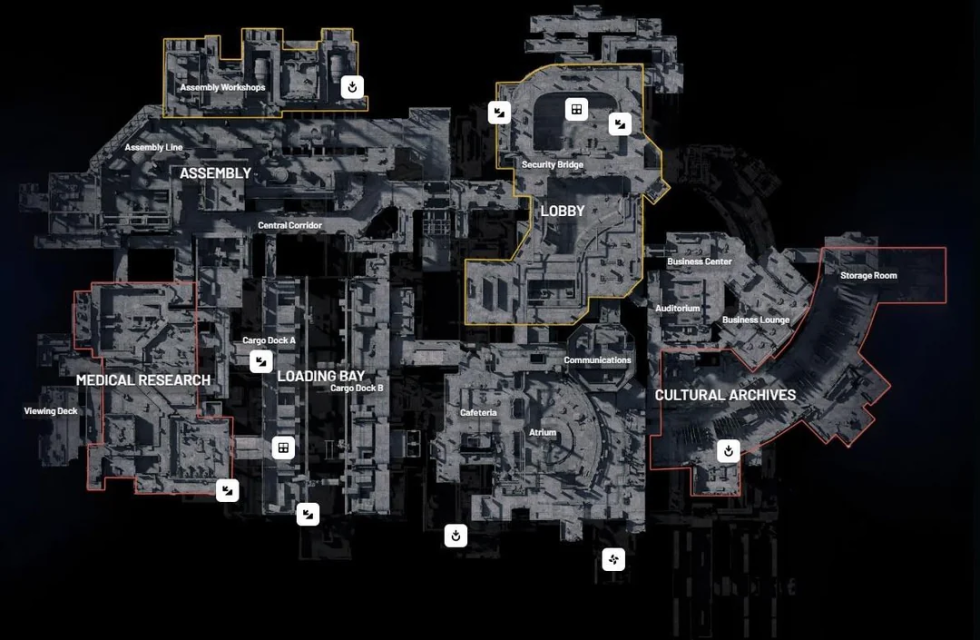
The maps
ARC Raiders combines a nerve-wracking survival feel with tactical shooter gameplay, where you don’t force linear progress but start each round anew. From Speranza, you prepare your equipment, refine your own skill tree, decide on tasks and then enter a large open map where humans and machines can be a threat at the same time. The maps are not only different locations, but also symbolize increasing responsibility and difficulty:
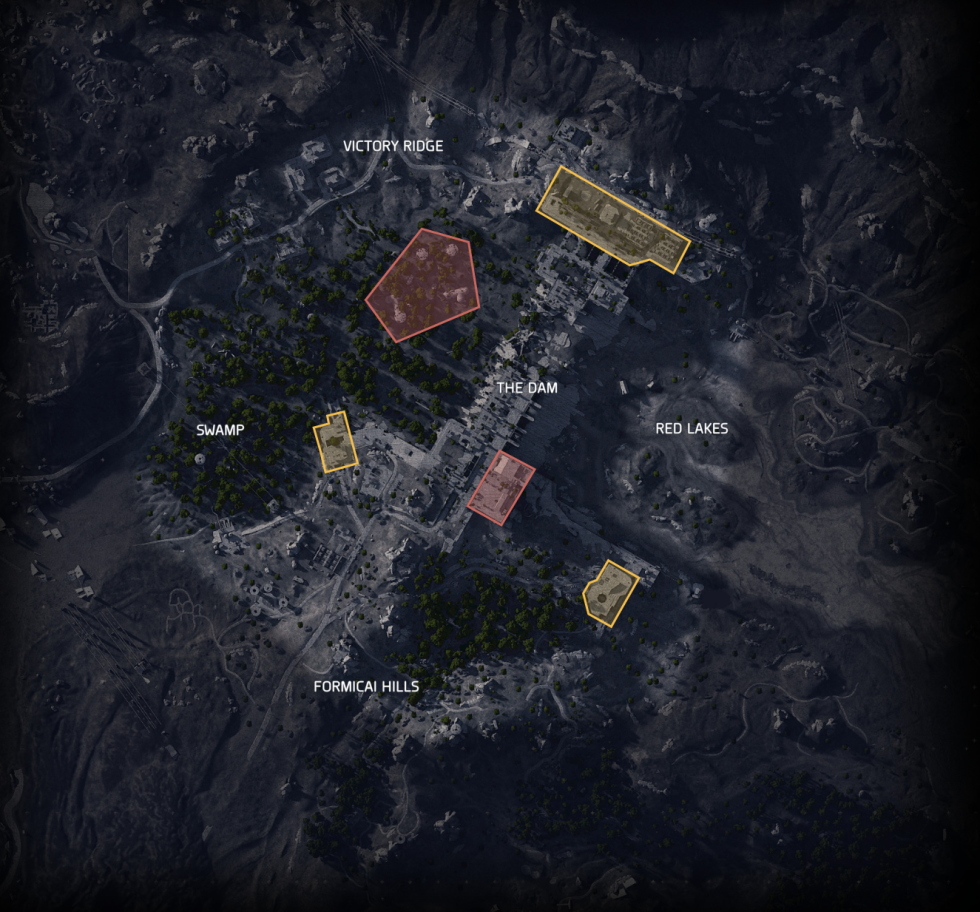
DAM BATTLEGROUNDS: The birthplace of every raider
Dam Battlegrounds is the place where almost everyone takes their first steps. The terrain is defined by the massive dam, a control tower, old pumping stations, sump pits and dilapidated supply buildings. This map is neither too complex nor too open – it’s a learning ground that teaches you how to use cover, how to read sound, and how to differentiate between ARC patrols and PvP hazards.
The control tower is the eye of the storm. Many players instinctively sprint there to secure loot quickly, but that’s where the hell begins. If you’re new, watch the tower from a safe distance and work your way in from the outskirts. The swamp zones in the east and the abandoned research containers in the west often offer quieter loot areas where you can get your bearings and fill your bag.
What sets Dam Battlegrounds apart is its training effect: you learn to spot enemy heads over hilltops, choose paths that aren’t visible from afar, and you quickly learn how deadly an open line across a bridge can be. The map is fair, but only for those who don’t run through the middle, but diagonally, over cover, with breaks.
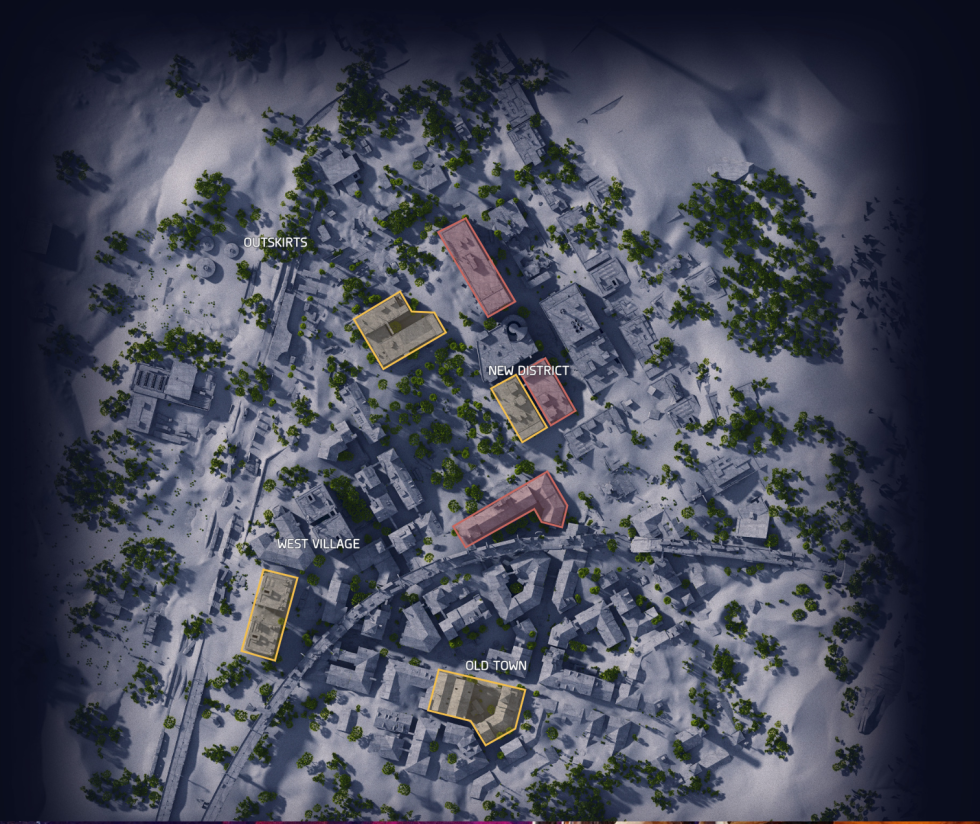
BURIED CITY: The buried megacity
Buried City feels like the skeleton of a world that once existed but has now been swallowed up by the sand. Skyscrapers are half collapsed, shopping centers lie buried, streets have become narrow aisles. The game is different here: you hear more than you see.
This map is the home for all those who like to play urban games; fights behind door frames, suddenly gaping lines of sight between windows, rooftop battles, corridor skirmishes and quick changes of direction are part of everyday life here. One advantage of this map is that you can hide perfectly. A disadvantage is that you almost never know which corner the next shot will come from if you are not paying attention.
Important spots such as the old hospital, the flooded parking garage or the Galleria attract many players because they contain mission objectives and good loot. If you want to master Buried City, move like a shadow: Take alternative routes across rooftops, climb up elevators, use side doors instead of main entrances and always keep moving when you hear noises in a building.
Buried City is the map where it’s not the fastest who wins, but the one who is the quietest, most patient and most attentive.
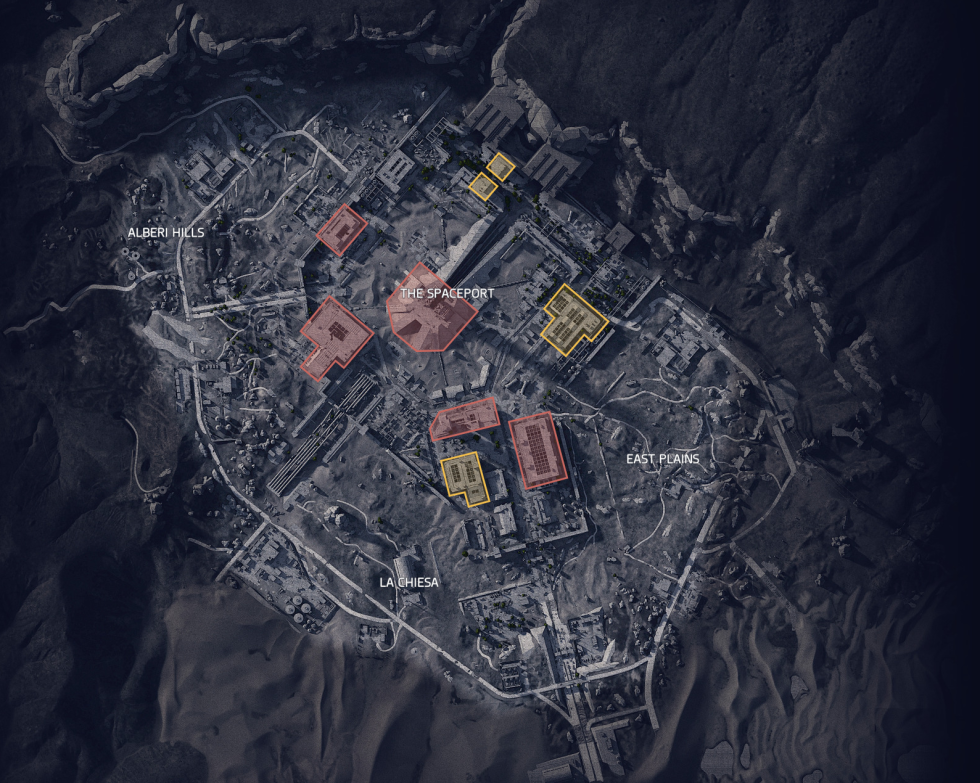
THE SPACEPORT: The abandoned spaceport
The Spaceport is the place where technology giants collide: Rocket hangars, launch towers, maintenance facilities and hidden security rooms dominate the scenery. This map is notorious for its incredible loot – but only for raiders who know where to go and when to leave.
The halls are full of corridors, loading ramps and mech remains. Some rooms can only be opened with certain keycards, and that’s where the golden loot begins. But it’s also the area where you’ll get caught in the crossfire the quickest, as many players are aiming for the same objectives.
The Spaceport forces you to never tackle the danger head-on. This is one of those maps where a single misstep – a wrongly opened door, a rash sprint across a hangar – is enough to draw both ARC units and other raiders to you. If you want to survive here, you have to think ahead, be able to retreat and always know a second escape route.
Players who master The Spaceport are often the ones who have learned that the most powerful weapon is not the one in your inventory, but control of the terrain and the patience to wait for the right moment.
THE BLUE GATE: The Sniper Mountains
Blue Gate is the rockiest, most expansive and most dangerous piece of land in the entire game. The mountains offer you infinite visibility, height advantages and tactical aisles, but these advantages are also used against you. If you walk carelessly in the valley here, you will become a silhouette in the crosshairs in seconds.
The terrain consists of massive rock formations, aisles, caves, old bunkers and tunnels. ARC units patrol particularly intensively here and can quickly trap you between rocks if you are too loud or stay in the same place for too long.
Blue Gate is the map that tests your ability to control distance. You don’t need to shoot well, you need to see well. Players who use this map rely on ranged weapons, slow advances, clean retreat routes and the ability to rotate over rocks without haste but with caution.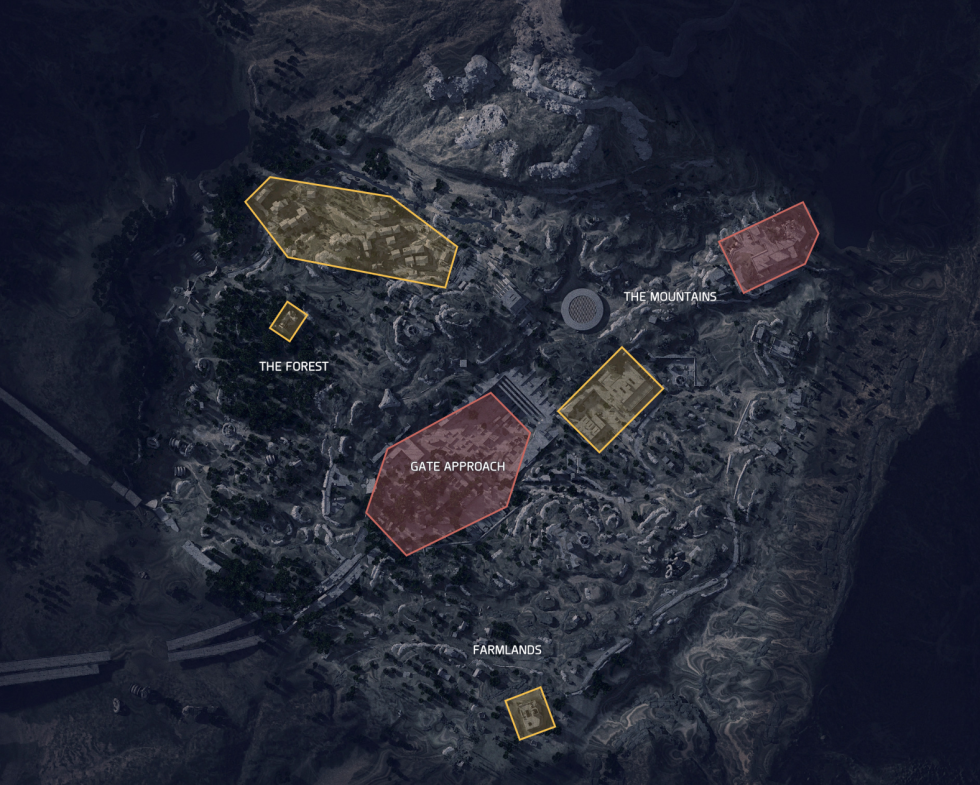
More so here than on any other map:
“Whoever is seen first has already lost.”
STELLA MONTIS: The heart of research
Stella Montis is a sealed-off research facility deep in the mountains, a place that looks like a mixture of laboratory, vault, hospital and high-security complex. The entire area consists of narrow rooms, winding corridors, locks, door systems and test laboratories. It’s the map that gets your pulse racing.
There are hardly any open spaces here. Almost every room has at least two entrances, and every corridor can be a deadly trap. ARC units are more aggressive, faster and more unpredictable here. Melee machines such as shredders or experimental ARC prototypes in particular can tear entire teams apart in a matter of seconds.
Stella Montis rewards cool heads: Smoke, Flash, precise grenade throws, quick changes of direction, silent action and door control are the key. Anyone who moves frantically here will immediately lose their bearings and therefore their lives.
This map is a pure reaction and close combat tactical area. It is not for players who are in a hurry. It is made for those who understand structure, spatial control and enemy psychology.
What makes ARC Raiders unique is the way it forces you to make decisions not in combat or shooting logic, but in silence, risk analysis and retreat planning. Most mistakes don’t happen because you’re “too weak”, but because you’ve gotten too loud, too fast or too greedy. If you live longer, you level up faster. If you think carefully, you become dangerous. If you stay quiet, you control the playing field.
What makes ARC Raiders so special is the fact that each map is not just a location, but a gameplay experience in its own right.
- Dam Battlegrounds teaches you the game.
- Buried City teaches you caution.
- The Spaceport teaches you control.
- Blue Gate teaches you distance.
- Stella Montis teaches you panic control.
A raider who understands all the cards is not just “good”, he is survivable.
Weapons and talents guide
The weapon world of ARC Raiders follows a simple principle: control beats power. The hardest shot won’t do you any good if you miss in a panic, especially in a game where every round can be valuable. That’s why weapons are not considered “good” because they promise high DPS, but because they are reliable, stress-resistant and versatile. Weapons that make aiming easier and react predictably under pressure are recommended for beginners.
The most common and strongest all-round weapons include the Ferro, Stitcher and Kettle. These three are considered resilient, easy to control and good to use in situations where you need to react in an emergency instead of being able to plan precisely. The Ferro, for example, delivers solid damage with cleanly controllable recoil. Stitcher takes on the role of a reliable follower, never spectacular, but a lifesaver in almost any situation. Kettle feels particularly good for players who value precision and single shots. Later in the game, you’ll encounter special weapons that open new doors in either ranged combat or burst damage. The Osprey sniper rifle is perfect for players who have patience and can read the map, while the legendary Jupiter is a ranged weapon that can completely turn individual battles, but only if you have the courage to actually decide from a distance alone.
The Anvil, on the other hand, is a fierce hand cannon that has earned its name: few shots, but one of them is often enough to end a fight. It requires nerve control, steady hands and situational awareness. The Equalizer is a completely different proposition, drawing its advantage not from precision but from continuous energy discharge, a weapon that drags out fights, forces opponents to leave cover and puts ARC units under constant pressure. On the brute side, there are weapons such as IL Toro, a shotgun that explodes like a jackhammer in close combat, but only if you are so close to your target that you can hear the sound of his breathing. For area and group control, there’s the Hullcracker, an explosive tool that blows up groups of enemies, cover or ARC nodes, but can also destroy you at the wrong angle.
No matter which weapon you choose:
A weapon is not a playstyle, your playstyle determines your weapon.
The talent tree in ARC Raiders is not a classic “damage armor” system, but a survival tool that shapes your entire identity as a raider. It is divided into three main categories: Movement, Resilience, and Survival Economy. Many players tend to unlock offensive talents first, assuming that this will make them stronger. In ARC Raiders, however, the player who doesn’t die is actually more dangerous than the one who hits hard.
Therefore, a sensible talent build-up starts with everything that gives you freedom of movement, stamina, recovery ability and flexible escape conditions. Skills that make sprinting, running, crouching, dodging, climbing, falling or redirecting easier turn you into a target that is almost impossible to assess, and that is where true power lies. As soon as you can run without getting out of breath in stressful situations, your next stage of development should involve weight-bearing: You want to be able to carry more without becoming cumbersome, you want to carry more tools without losing freedom of movement, and you want to survive situations that other raiders would mercilessly end.
Only then does the survival branch become interesting: skills that improve loot, open containers, enable crafting or give you efficiency advantages turn you into a player who becomes more stable, not riskier, from round to round. Those who understand resources dominate the game, not necessarily the battle. The talent tree in ARC Raiders is therefore a thought experiment: “Do you want to kill or do you want to come home?”
The pros know:
Killing is a moment. Survival is a system.
Game tips
On Dam Battlegrounds, the ideal run always starts far away from the control tower, as newcomers and aggressive players arrive there almost simultaneously. A safe start is at the outer edge near the old pumping stations. From there, you can move quietly along the water’s edge, past the rusty supply pipes, which are perfect for cover. Your loot round should take you past the small supply sheds and abandoned containers, where healing, light ammunition and basic weapons often appear. Only when you are well equipped is it worth making your way towards the dam. The closer you get to the control tower, the more important it becomes to observe from an elevated position whether doors are open or enemy movements are visible on the railings. As soon as you realize that the area is getting hot, it is best to find a lateral retreat corridor and extract at a less frequented point south of the dam.
A build that focuses on freedom of movement and stability is suitable for this map. You don’t need extreme firepower, but weapons that are forgiving of mistakes. A set consisting of a Ferro or Tempest as a reliable medium-range weapon and a secondary backup weapon such as a revolver or an IL Toro for tight situations in buildings is ideal. The talent tree in this region should focus on fast stamina regeneration, silent movement and carrying capacity so that you can loot for longer without constantly reaching your limits.
Buried City is one of the most dangerous areas to run around without a plan. The best route is rarely through the main streets, but through rooftops and back alleys. A good entry point is in the old apartment block on the north-eastern edge. By climbing over the remains of balconies, collapsed fire escapes and roof debris, you can move quietly and dangerously at the same time. You will automatically pass several high-value points: a hidden laundrette that often contains ammunition, a half-buried office complex and an old pharmacy where healing spawns. The Galleria can be reached from there, but only if you come from above and listen first to see if there is any activity below. The second loop begins in the west, where the flooded parking garages are located. From there, you can make your way into the city through side entrances without ever having to enter the main square.
The perfect build for Buried City combines precision and close combat skills. Osprey or Kettle are strong when working from rooftop to rooftop, while an IL Toro or Stitcher will have your back if you’re suddenly surprised in stairwells. Mobility points, which make rolls cheaper, are worth their weight in gold in this map, as tight spaces mean that evasive maneuvers are often your only salvation. Survival points such as Looter’s Instincts work well here because building loot is particularly productive.
The Spaceport is a treasure trove, but only for players who stay structured and cold. The best route does not start in the large hangars, but in the side maintenance wing. There you will often find toolboxes and key items that give you access to locked technical rooms. Once you have the key, you gradually move deeper into the facility. The most important rule in the spaceport is: listen first, then go. Many players rush straight into the main hallway zone. Instead, you work your way from side door to side door like an infiltrator. Your route will take you through the service rooms below the starting platforms, where you will often find rare mods and mid-muna weapons. At the end of your turn, only cross a hangar openly if you are sure that no player is currently populating the upper gallery.
The map requires a build that is designed for control. Tempest or Jupiter are ideal main weapons because the long lines of sight in the spaceport allow you to identify enemies early on. An Anvil or Equalizer is a good match if you need to take out enemies quickly in narrow service corridors. The talent tree should focus heavily on encumbrance and stability; you want to carry heavy weapons without feeling like a tank. Skills that improve reload time and weapon switching are extremely valuable here.
Blue Gate is the most tactical area in the entire game. The best route starts high up, never in the valley. If you choose the mountain path in the east, you will come to natural high points that allow you to look unobtrusively over the entire area. From there, don’t charge blindly forward, but watch with a hunter’s eye to see which ARC patrols appear, where players are rotating and which routes are safe. As you move from rock to rock, you will automatically reach two large supply depots: the old mine and the sensor station. Both contain powerful ammunition, mods and long-range weapons.
An optimal Blue Gate build revolves around distance control. Jupiter, Osprey or other DMRs are absolutely deadly here. You also need skills for steady hands, stability when aiming and longer breath control. Mobility skills such as reduced stamina costs for jumps and rolls are essential here, because a misjudged step can send you over a ledge or straight into ARC patrols. It’s also worth carrying a light secondary slot in case someone suddenly pushes you up the slope.
Stella Montis has the most challenging loot routes. It’s best not to start at the main entrance, but via the southern side tunnels, which lead you into small maintenance chambers. These often contain early healing items, utility tools and mods. From there, you gradually move deeper into the experimental areas. A key room lies behind the second airlock; if you reach it before other players do, you’ll have access to rare resources that are otherwise highly contested. The lab corridors are deadly traps – so open each door staggered, with a short peek and smoke ready. Your extraction should never take place through the center, but always via the narrow side tunnel segments.
The ideal build for Stella Montis combines blind boundaries, control, acoustic orientation and pure cold-blooded utility. Anvil, IL Toro and Equalizer are perfect here because their strengths lie in the close and midrange range. The talent tree should prioritize fast regeneration, reduced melee damage effects, increased carry capacity for thrown grenades, and reduced interaction times. Imagine: Every second decides whether you or the opponent in the narrow corridor shoots first.
The ultimate pro weapon guide
The weapons in ARC Raiders look like classic shooter weapons at first glance, but in reality they form a tactical ecosystem that you need to understand before you can compete at the highest level. Every weapon has a role, and not every role suits every map, every enemy or every player. A pro in ARC Raiders is not the best shooter – it’s the one who chooses their weapon to suit the terrain, the game situation and their own talent tree. That’s why here’s a weapon guide that not only describes the usual strengths, but also explains why certain weapons work in the high-level game and how you can use them in any situation.
The art of mid-range control: Ferro, Tempest & Stitcher
For most professionals, guns like Tempest, Ferro and Stitcher form the backbone of their loadouts. They are not the spectacular tools that decide everything with a single shot, but they offer something much more important: consistency under stress.
The Tempest is the prime example of an all-round rifle. It reacts predictably, works through layers of armor, has a controllable recoil and hits even when your hands are shaking or you have to slip into cover while sprinting. Professionals appreciate it because it works in every map – in Dam Battlegrounds, in the sands of Buried City, in the hangars of the Spaceport, in the mountains of Blue Gate and in the narrow corridors of Stella Montis.
The Ferro goes in the same direction, but with a more direct feel. It is ideal for close to medium range and shines especially in chaotic situations where you need to make quick corrections. Players with an aggressive style of play in particular use Ferro to build up pressure, hold down ARC units and force opponents into cover.
Stitcher, on the other hand, is the inconspicuous weapon that is often underestimated until you play with it yourself. It’s the reliable tool that never lets you down. No extreme damage profile, no complicated handling – but a hit rate that is crucial in real fights. Many pros use Stitcher as a backup because it simply works, especially in moments when you are unintentionally caught off guard.
The highly talented precision tools: Osprey, Jupiter & Kettle
Where medium-range weapons win on stability, snipers and DMRs dominate on information control. Weapons like the Osprey, Jupiter and even the precise Kettle win battles before they start because they scout, isolate and force opponents to give up their position.
The Jupiter is the ultimate long-range weapon for players with a steady hand and tactical composure. It is not designed to fire constantly. It is a surgical instrument that you lay across the map on Blue Gate like a pair of scissors. One shot decides a battle, one hit immediately destroys any initiative your opponents have. In the hands of a pro, the Jupiter is a range dominance weapon that is also deadly in spaceport hangars when holding high balconies or control platforms.
The Osprey feels more versatile: It’s the choice for players who like to control information. Whoever plays with it decides when a battle begins and when it ends. You force enemies to come out of cover, ARC units no longer surprise you – and you set the pace of the entire raid.
The Kettle, on the other hand, is an underrated DMR hybrid. It doesn’t shine with raw firepower, but with its ability to fire precise shots in high-pressure situations. Professionals use the Kettle primarily in Dam Battlegrounds and Buried City, where medium distances dominate and quick, pinpoint hits are more important than massive volleys.
The heavy hammers: Anvil, Equalizer & Hullcracker
In high-level play, brute strength is often not the difference between victory and defeat – but there are times when you need something to end a fight immediately. This is where the heavy weapons come into play: Anvil, Equalizer and Hullcracker.
The Anvil is a weapon that exudes “authority”. Anyone who carries it knows that every shot has to be right – but if it is right, the fight is over. The weapon forces you to be disciplined and to use timing. It is ideal against armored ARC units, against raiders with heavy builds and generally in situations where you don’t have much space. In Stella Montis, a single Anvil shot can neutralize an entire melee overrun.
The Equalizer doesn’t work with precision, but with pressure. It burns cover, eats through ARC lines and forces enemies to leave their position. This weapon almost feels like a tool for territory domination. If you play Equalizer right, you have a mobile wall of fire that is absolutely devastating, especially in narrow spaceport corridors or Stella Montis lab corridors.
The Hullcracker is the king of area damage. It is not a tool for the unwary, as a poorly placed shot can ruin your own escape. But if you’ve got the hang of it, you’ll clear out ARC groups, cover and structures before they can even play a role. It works best as a secondary weapon when you know you need to control spaces.
The true pro rules for weapons
A pro understands three things that beginners often ignore:
1. The best weapon is the one that gives you time.
Not the one that does the most damage.
2. A weapon is only as strong as the position from which it is used.
3. A weapon only becomes powerful when your talent tree supports it.
An Anvil without stability perks is a gamble.
A Jupiter without stamina management is useless.
A Tempest without movement synergy loses to anyone who is faster in cover.
A real pro doesn’t arm himself – he builds himself around the weapon.
Final player wisdom key
ARC Raiders is not a game for daredevils, but for thinkers. It rewards cold blood, not a hot heart. It measures success not in kills, but in homecomings. Amen.
In short:
The true strength of a raider is not shown at the top, but only at the bottom in Speranza.
Source: ArcRaiders


2 Antworten
Kommentar
Lade neue Kommentare
Neuling
Veteran
Alle Kommentare lesen unter igor´sLAB Community →